
13 May 2018 Update: Check out my best accessories for the X-E3 here.
Getting a new camera can be both an exciting an frustrating experience. You could be moving from one brand to another and having to decipher the menu hierarchy. Or you could be upgrading within the same brand and wishing that they transfer settings from one to another as seamlessly as the new iPhones on iOS 11.
I’ve compiled a list of settings that I have changed when I bought the Fujifilm X-E3. Some of them make your camera function better out of the box, and the other are tied to your shooting style.
Equipment in this Post
Make it a better camera out of the box
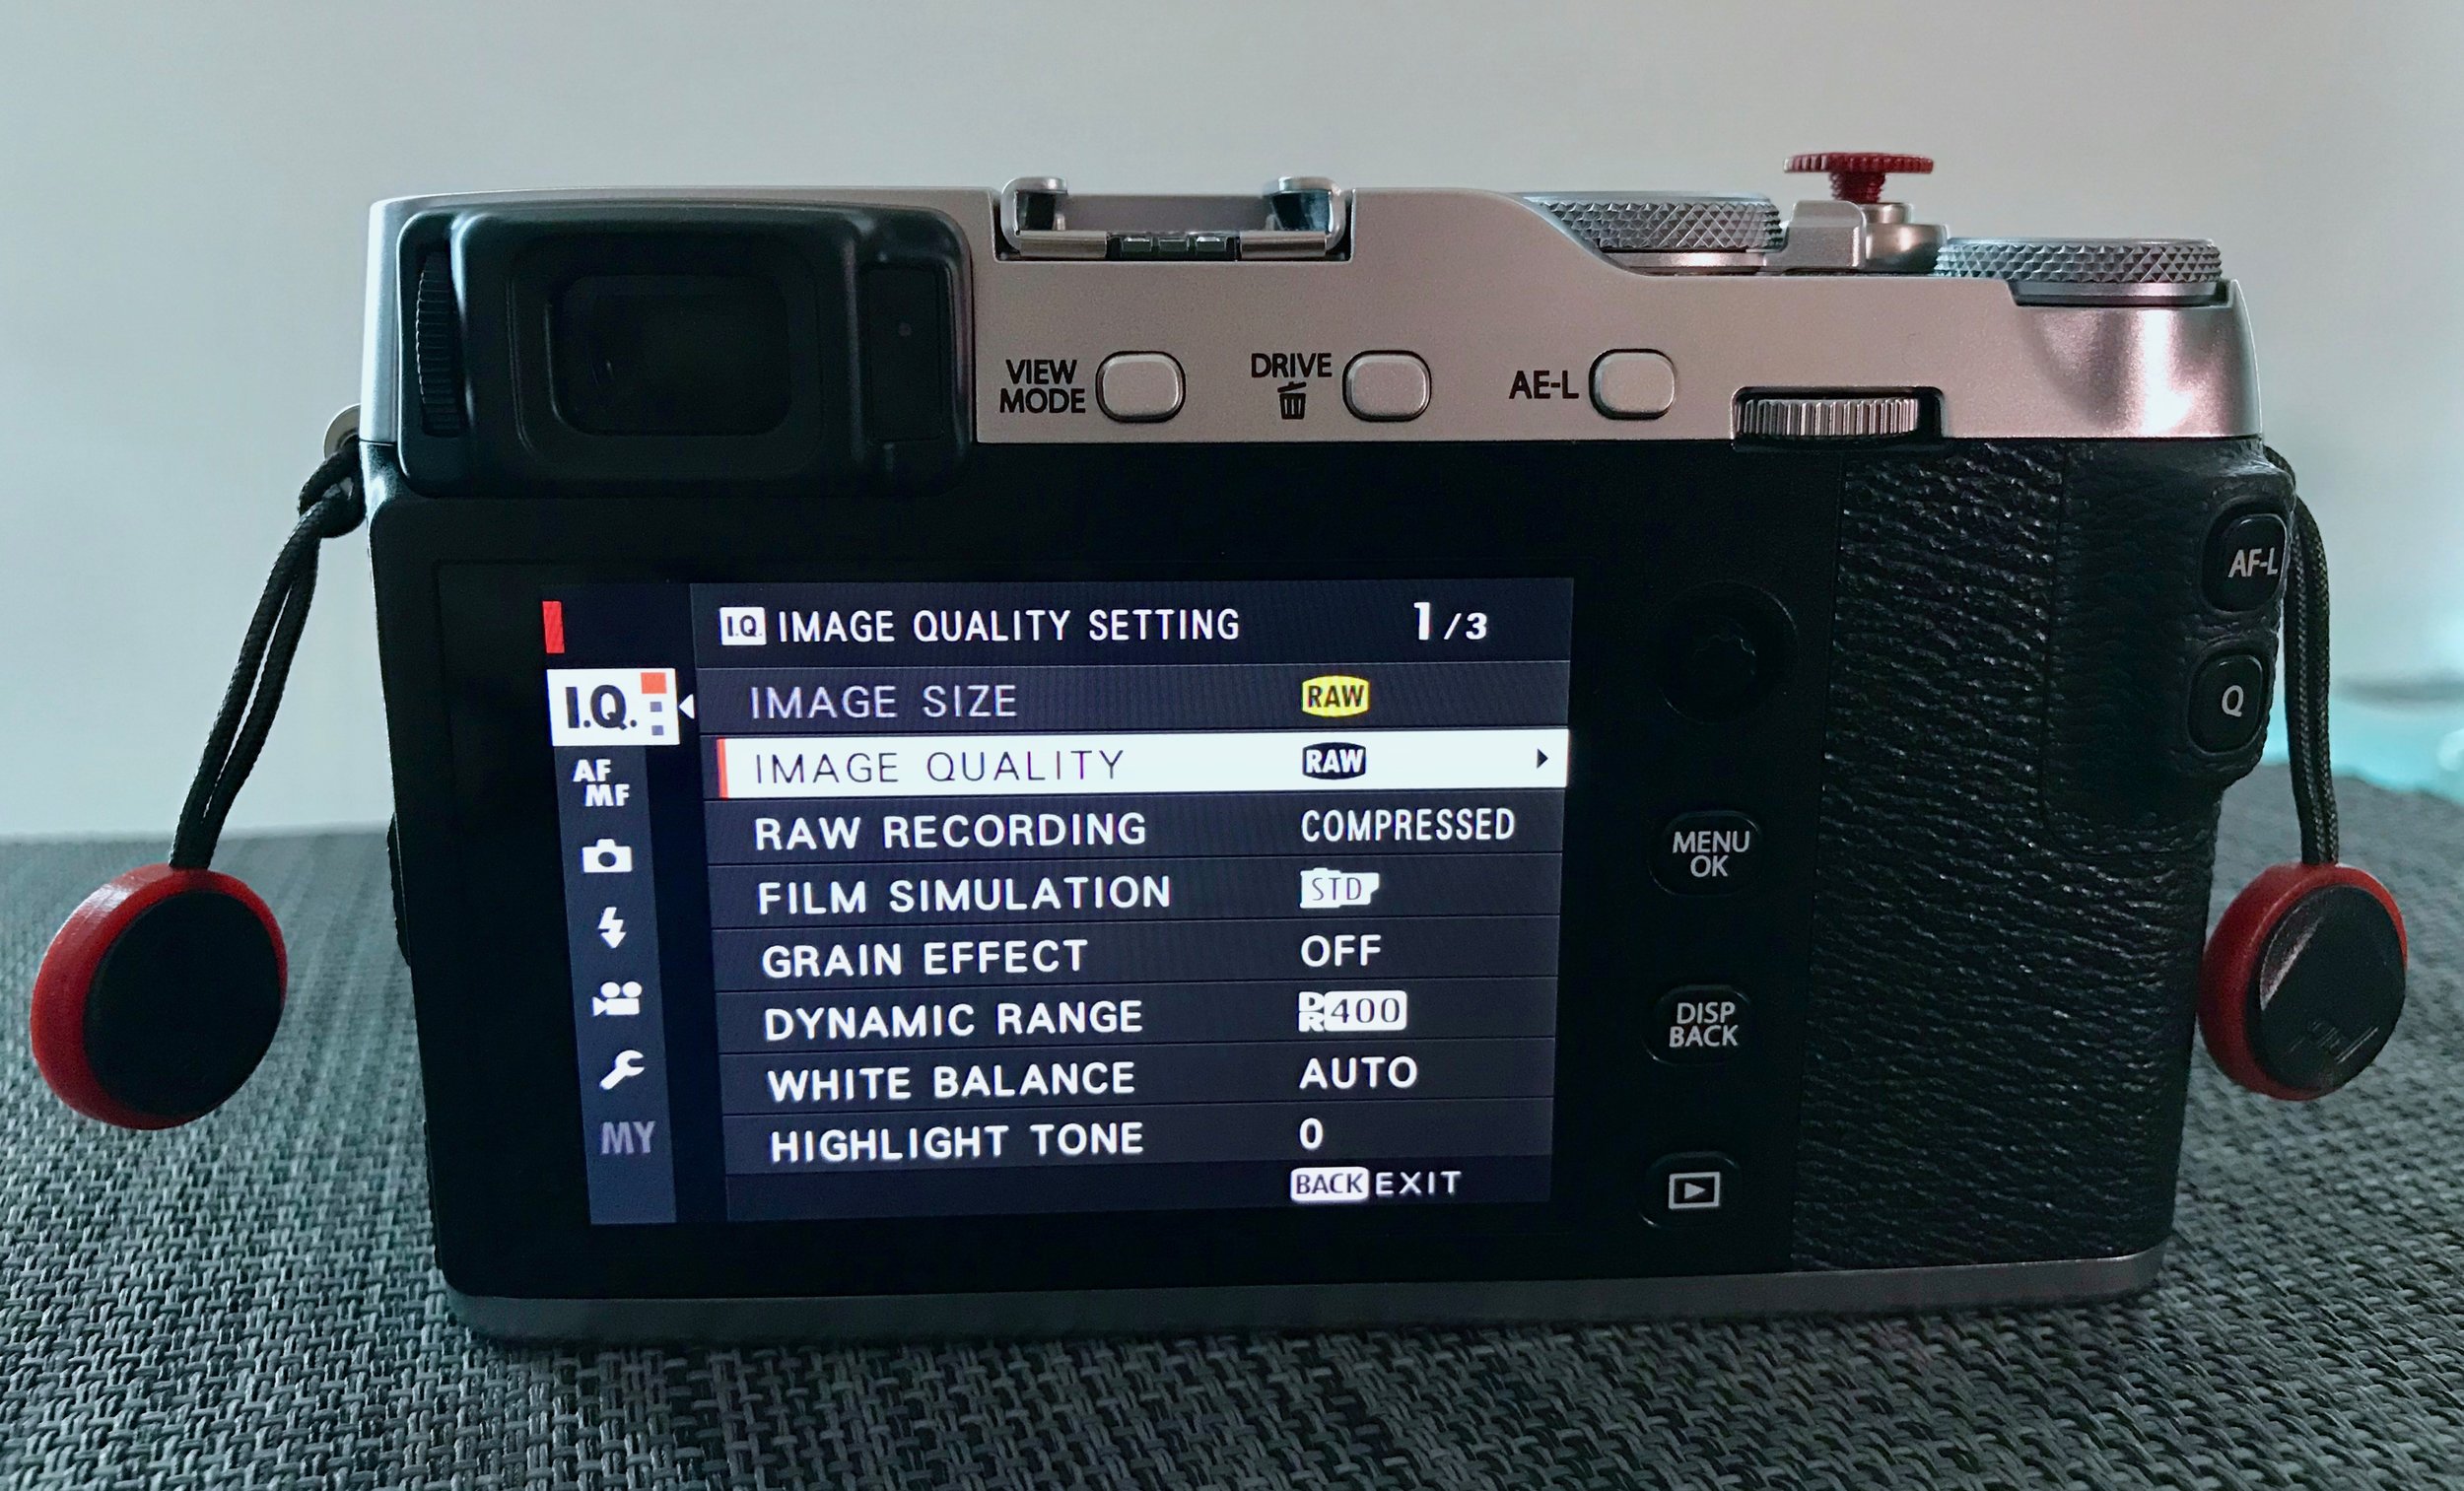
Image Quality to RAW
Shooting JPEG can be liberating at times, but I always value the flexibility that RAW files provide. I used to shoot tripod and potential portfolio work in RAW and everything else (snapshots) in JPEG. But these days I shoot everything in RAW due to the smaller file sizes that compressed raw takes up. I also value the flexibility in changing film simulations once the shot is taken. This means that I can leave my film simulation on Acros when I’m feeling black and white and shoot without FOMO as I can always process it in colour later on.
- Image Quality Setting (1) -> Image Quality -> RAW
- Image Quality Setting (1) -> Raw Recording -> Compressed
Dynamic Range to DR200
Disclaimer: I’ve edited this section to reflect DR200 instead of DR 400 due to the flickering issue, it’s better to understand what works for you based on the parameters below.
-
DR Auto switches between DR 100 and DR 200 modes depending on the scene. If DR 200 is selected while DR Auto is set, Lightroom will preview the RAW files seemingly 1 stop underexposed. This is not irreversible, you just have to rework the exposure, highlights and shadows (which is what the camera does automatically anyway in the DR 200 and 400 modes anyway)
-
It recognises Fuji’s DR 400 in the sense that it renders the preview for RAW file at the right exposure.
-
The advantage of shooting at a lower DR when shooting RAW is that you get a more “pure”, flatter image when you do post-processing. The “advantage” when shooting JPEG is, well, a lower dynamic range.
-
You also get access to a lower base ISO (ISO 200 at DR 100, ISO 400 at DR 200, ISO 800 at DR 400). This is something to consider if you use Auto-ISO and cannot stand whatever little noise there is in the image at ISO 800.
I used to detault to DR 400 with my previous X-series bodies but I’ve set my X-E3 to DR 200 for the past few days due to the flickering issue and am finding it adequate, so I might stick with DR 200 for now.
Color space to Adobe RGB
Adobe RGB gives you a wider colour gamut than sRGB, important in this day where consumer devices ship with a P3 capable with colour calibration across profiles. This already came in preset in my X-E3 so Fujifilm might be shipping cameras set to Adobe RGB from now on, but just check to be safe.
- Image Quality Setting (2) -> Color Space -> Adobe RGB
Set your camera to High Performance
This takes a slight toll on battery life, but it beats missing your shots if the camera performs slowly. The X-E3’s LCD frame rate drops after a few seconds of non-usage, you might see a stutter when you pick it up. Auto-focus and the refresh rate of the LCD/EVF is also improved with Performance mode.
- Set Up -> Power Management -> Performance
Activate the electronic shutter
A shutter limited to 1/4000s can quickly become a problem when you’re using the great F1.2 or F1.4 lenses. Enable the electronic shutter to go up to 1/32000.
- Shooting Setting (1) -> Shutter Type -> Mechanical + Electronic
Activate 4K Videos
4K recording is not enabled by default, so be sure to enable it in the menus
- Movie Setting (1) -> Movie Mode -> 2160/29.97P
Turn on Face Detection
I find this to be useful 70% of the time as my subjects tend to be single people. It really helps out when using the F1.4 or F1.2 lenses. I also have this setting on my Q menu so I can turn it off when I’m in scenarios where it doesn’t work.
- AF/MF Setting (2) -> Face/Eye Detection Setting -> Face On/Eye Auto
Display your last image taken automatically on the LCD when using the EVF
Another one of the useful features introduced in the recent X-T2 update. This turns the LCD into an automatic review display when you’re shooting with the viewfinder. It will automatically display the last image taken when you take your face off the camera.
- Look into the viewfinder
- Press the View Mode button until you see Eye Sensor + LCD Image Display.
Make your Fujifilm X-E3 your own
Customise your viewfinder and LCD
With the Fujifilm X-series camera, you can make your viewfinder your own. This is easily missed but is really what you should set up first to make the camera your own. Here’s what I have enabled:
- Framing Guideline
- Electronic Level
- Focus Frame
- MF Distance Indicator
- Live View Highlight Alert (Blinkies)
- Aperture/S-Speed/ISO
- Information Background
- Expo. Comp (Scale)
- Focus Mode
- Photometry
- Shutter Type
- Flash
- Continuous Mode
- Dual IS Mode
- Touch Screen Mode
- White Balance
- FIlm Simulation
- Dynamic Rnage
- Frames Remaining
- Image Size/Quality
- Movie Mode & Rec. Time
- Image Transfer Order
- Battery Level
- Set Up -> Screen Set-up (2) -> Disp. Custom Setting
Customise your physical controls
You can remap 4 physical buttons, plus the four swipe gestures on the touch screen to a function that you regularly use.
- Set Up -> Button/Dial Setting (1) -> Function Fn Setting
Customise your Quick Menu
The Q button brings up quick menu that can be customised to your shooting style. I use this mainly to toggle Face/Eye Detection. Dynamic range and the self timer.
- Set Up -> Button/Dial Setting (1) -> Edit/Save Quick Menu
My personal preferences
Store AF mode by Orientation
One of the useful features introduced in the X-T2 firmware earlier this year, this can store either a separate focus area, or the focus area and AF mode for portrait and landscape orientation. Very useful when shooting portraits where you regularly switch between orientations, but have the crucial parts of the image in different corners.
- AF/MF Setting (1) -> Store AF Mode by Orientation -> Focus Area Only
MF Assist to Digital Split Image
I borrowed a friend’s Leica M9 recently and have gotten hooked to this method of focusing in MF mode. It’s simply quicker and works with less ambiguity for me.
- AF/MF Setting (2) -> MF Assist -> Digital Split Image -> Color
Turn off Long Exposure NR
I prefer to do selective noise reduction separately in photoshop. Applying NR to entire images might lead to loss of detail.
- Image Quality Setting (2) -> Long Exposure NR -> Off
Turn off Shutter AF in AF-C mode
I use back button focus when I’m tracking a subject in AF-C mode. This turns off the half-press shutter auto-focus feature. You can also turn it off for AF-S if you’re a purist.
- Set Up -> Button/Dial Setting (1) -> Shutter AF
Map Auto-focus to the AF-L button
This enables back button auto-focus. You can either do this with the AE-L or the AF-L buttons, depending on which is more ergonomic for you.
- Set Up -> Button/Dial Setting (1) -> Function Fn Setting
Turn off EVF Auto Brightness
It’s a viewfinder. You view it through a peephole. You don’t need brightness adjustments.
- Set Up -> Screen Set-up (1) -> EVF Brightness -> Auto
Make your Fujifilm X-E3 your own
Customise your viewfinder and LCD
With the Fujifilm X-series camera, you can make your viewfinder your own. This is easily missed but is really what you should set up first to make the camera your own. Here’s what I have enabled:
- Framing Guideline
- Electronic Level
- Focus Frame
- MF Distance Indicator
- Live View Highlight Alert (Blinkies)
- Aperture/S-Speed/ISO
- Information Background
- Expo. Comp (Scale)
- Focus Mode
- Photometry
- Shutter Type
- Flash
- Continuous Mode
- Dual IS Mode
- Touch Screen Mode
- White Balance
- FIlm Simulation
- Dynamic Rnage
- Frames Remaining
- Image Size/Quality
- Movie Mode & Rec. Time
- Image Transfer Order
- Battery Level
- Set Up -> Screen Set-up (2) -> Disp. Custom Setting
Customise your physical controls
You can remap 4 physical buttons, plus the four swipe gestures on the touch screen to a function that you regularly use.
- Set Up -> Button/Dial Setting (1) -> Function Fn Setting
Customise your Quick Menu
The Q button brings up quick menu that can be customised to your shooting style. I use this mainly to toggle Face/Eye Detection. Dynamic range and the self timer.
- Set Up -> Button/Dial Setting (1) -> Edit/Save Quick Menu
Conclusion
I hope this post has been valuable in helping you get the most out of your X-E3.
You should also check out my best X-E3 accessories here.
What are some of your must have settings? Let me know in the comments below!
Great post thank you! Will be very useful after my body arrives in mail. Regarding DR, so Lightroom converts RAW files shot with DR auto to DR 100 equivalent? But it recognizes Fuji’s DR 400? And is there any advantage to having a lower standard DR? Thanks.
Hi Peter, my apologies as my initial post may have been too ambiguous and misleading. For clarification:
1) DR Auto switches between DR 100 and DR 200 modes depending on the scene. If DR 200 is selected while DR Auto is set, Lightroom will preview the RAW files seemingly 1 stop underexposed. This is not irreversible, you just have to rework the exposure, highlights and shadows (which is what the camera does automatically anyway in the DR 200 and 400 modes anyway)
2) It recognises Fuji’s DR 400 in the sense that it renders the preview for RAW file at the right exposure.
3) The advantage of shooting at a lower DR when shooting RAW is that you get a more "pure", flatter image when you do post-processing. The "advantage" when shooting JPEG is, well, a lower dynamic range.
4) You also get access to a lower base ISO (ISO 200 at DR 100, ISO 400 at DR 200, ISO 800 at DR 400). This is something to consider if you use Auto-ISO and cannot stand whatever little noise there is in the image at ISO 800.
I’ve set my X-E3 to DR 200 for the past few days due to the flickering issue and am finding it adequate, so I might stick with DR 200 for now. I’ve corrected the post to reflect the above, thanks for commenting!
I was intrigued by your use of compressed RAW until I shot a few images and tried to open them on my Mac… They aren’t supported! I don’t have Lightroom so had to download the Fujifilm Viewer app which is awful! Back to JPEG + RAW then…
Hi Jonathan, that’s one of the things that frustrates me about compressed raw since the X-T2 too. I’ve submitted feedback to Apple but here’s hoping more people will do the same so they’ll support compressed raw natively not just in macOS but in iOS too.
Hi, I love your posts, however I would think once more for choosing the Adobe over sRGB. It looks like no brainer to choose wider color gamut over the smaller one but… If somebodys work is mainly for digital (internet) it is probably better to stay with the sRGB. Wider gamut doesn’t always mean better screen presentation as all browsers use sRGB to display colors and browser conversion from Adobe RGB to sRGB is making images look dull and way off.
Also, screen monitors will cover sRGB gamut up to 100%, but for Adobe RGB you cannot count on more than 75% (but mostly even less) for the 99% percent of the consumer screens today. So similar problem again.
With many print studios you will also find pretty hard time finding benefits of using Adobe RGB instead of sRGB for print materials…
So if you are not 100% sure that you will really benefit from using the Adobe RGB and about the exact purpose why do you need it is probably better to stick with sRGB.
The raw option has disappeared from my image quality setting? What did I do?
Is the Auto lever near the shutter button set to the Auto position? If it is, then the RAW setting will not be available.